
Before and after product result prompt composition
Master the Art of Before and After Product Result Prompt Composition.You know that specific feeling of staring at a blank blinking cursor, trying to figure out how to tell an AI exactly what’s in your head? You can see the transformation clearly: the “before” is dull, cluttered, or aged, and the “after” is a vibrant, polished masterpiece. But when you hit enter, the AI gives you a weird fever dream of blurred textures and overlapping limbs. It’s frustrating because, in digital marketing and content creation, a “before and after” is the ultimate proof of value. It’s the visual “hook” that stops the scroll.
Capturing that metamorphosis requires more than just a lucky guess. It requires a strategic approach to before and after product result prompt composition. In this guide, we’re going to pull back the curtain on how to build prompts that act as a bridge between your creative vision and the machine’s output.
1. The Anatomy of Before and After Product Result Prompt Composition

To master this, you have to stop thinking of a prompt as a sentence and start thinking of it as a blueprint. AI models—whether you’re using Midjourney, DALL-E 3, or Stable Diffusion—process information in chunks. If you don’t provide a clear structure for a comparison, the AI will likely “blend” the two states into one messy image.
A successful composition is built on four pillars:
The Spatial Layout: You must explicitly tell the AI to split the canvas. Without terms like “split-screen,” “diptych,” or “side-by-side,” the AI doesn’t know you want a comparison.
The Problem (The Before): This needs to be descriptive but not overwhelming. You are setting the baseline of the “pain point.”
The Catalyst (The Product): While the product might not always be physically in the frame, the effects of the product must be the star.
The Solution (The After): This is where you crank up the “wow” factor. This side needs more positive descriptors to create a psychological contrast for the viewer.
2. Setting the Scene: Technical Parameters
Before you even get to the creative adjectives, you need to handle the “boring” stuff that makes or breaks the professional look of your image. If your technical parameters are off, your before and after product result prompt composition will look like a low-res amateur snap.
Aspect Ratios and Framing
For a side-by-side comparison, a square $1:1$ ratio is often too cramped. You want room for the story to breathe. Using a $16:9$ or $3:2$ aspect ratio allows the AI to give equal weight to both the “before” and “after” sections without squishing the subjects.
Consistency is King
The biggest mistake beginners make is changing the camera angle between the two frames. To make the result believable, the camera must feel “locked” on a tripod. Use phrases like “fixed camera angle,” “identical perspective,” and “matching background” to ensure the only thing that changes is the product’s effect.
3. The “Recipe” for Success: Prompt Ingredients

Think of your prompt as a chemical reaction. If you miss one ingredient, the “after” won’t look convincing. You need to balance the grit of the problem with the shine of the solution.
Essential Prompt Ingredients Table
| Ingredient Category | Purpose | Example Keywords |
| Frame Type | Dictates the physical layout | Side-by-side comparison, diptych, vertical split |
| The “Before” State | Defines the pain point | Tarnished, oxidized, cluttered, lackluster, gritty |
| The “After” State | Defines the success | Pristine, high-gloss, rejuvenated, vibrant, sleek |
| Environmental Match | Keeps the image believable | Consistent studio lighting, same room, identical angle |
| Technical Finish | Ensures high-end quality | Ray-tracing, 8k, photorealistic, commercial photography |
4. Industry-Specific Prompt Strategies
Not all transformations are created equal. Depending on what you are promoting, your vocabulary needs to shift to trigger the right “aesthetic” in the AI’s database.
Skincare and Beauty: The Glow-Up
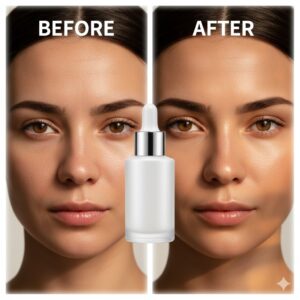
When composing prompts for beauty products, the AI tends to go overboard with “blurring,” making the skin look like plastic. To avoid this, focus on texture.
Before keywords: “Uneven skin tone,” “visible pores,” “redness,” “dull complexion.”
After keywords: “Dewy finish,” “refined texture,” “natural luminosity,” “supple skin.”
Pro Tip: Add “natural skin texture” to your prompt to prevent that “uncanny valley” AI look.
Home Improvement: From Chaos to Calm
Interior design transformations rely heavily on lighting.
Before keywords: “Harsh fluorescent lighting,” “shadowy corners,” “dated wallpaper,” “cramped space.”
After keywords: “Volumetric sunlight,” “scandinavian minimalism,” “open-concept,” “warm oak textures.”
Note: Use the word “renovation” to help the AI understand the drastic nature of the change.
Automotive and Tools: The Power of Shine
For physical products like car wax or rust removers, the contrast needs to be “sharp.”
Before keywords: “Oxidized paint,” “matte rust,” “weather-beaten surface.”
After keywords: “Mirror-like reflection,” “deep candy-apple gloss,” “hydrophobic beads.”
5. Advanced Techniques for Prompt Refinement
If you’ve moved past the basics, it’s time to look at the “levers” you can pull to gain total control over your before and after product result prompt composition.
Negative Prompting
This is the art of telling the AI what not to do. In transformation images, AI often tries to put two different people or two different objects in the frames. Use negative prompts like:
–no: different people, different background, watermark, text, blurry, distorted proportions.
Weighted Prompting
Sometimes the AI gets “stuck” in the “before” state because those details (like dirt or mess) are very visually heavy. You can use weights to tell the AI to focus more energy on the “after” result. For example:
"pristine clean finish::1.5" vs "dirty surface::0.5"
The “Shot Type” Strategy
To make your product look like a high-end advertisement, specify the lens. A “Macro 100mm lens” shot will give you those tight, detailed textures for skincare, while a “35mm wide-angle lens” is better for room renovations.
6. Frequently Asked Questions (FAQ)
How do I ensure the person looks the same in before and after product result prompt composition?
This is one of the hardest tasks in AI. The trick is to use a “Character Reference” (available in tools like Midjourney) or to describe the person with very specific, non-negotiable traits (e.g., “30-year-old woman with a sharp bob haircut and a mole on her left cheek”).
Why does my AI keep putting the product in the middle?
The AI is trying to center the subject. To fix this, use explicit directional language: “Left side shows [Before], right side shows [After].” Adding “vertical dividing line” can also help force the separation.
Can I use these prompts for video generation?
Absolutely. While this guide focuses on static images, the logic of before and after product result prompt composition applies to video “wipe” transitions as well. You simply describe the “wipe” effect moving across the screen from left to right.
Is there a way to add text like “Before” and “After” directly in the image?
Modern models like DALL-E 3 and Midjourney v6 are getting better at text. You can add: “with the word ‘BEFORE’ written in clean white typography at the top left and ‘AFTER’ at the top right.”
Conclusion
The power of a transformation image lies in its ability to tell a story without a single word of copy. By mastering before and after product result prompt composition, you aren’t just making pictures; you’re creating a visual narrative of improvement, hope, and results. You’re showing your audience that change is not only possible—it’s beautiful.
Remember, the best prompts are a mix of technical precision and creative flair. Don’t be afraid to iterate, tweak your “weights,” and play with different lighting styles until that “after” shot looks exactly like the success you’ve imagined.
Frequently Asked Questions about the Nano Banana Prompt Guide
1. What is Nano Banana?
Nano Banana is a fast AI image generation and editing model (officially Gemini 2.5 Flash Image) designed for quick image modifications, style transfers, and prompt-driven changes. It prioritizes speed and pattern-matching over structured reasoning.
2. How is Nano Banana different from Nano Banana Pro?
Nano Banana is optimized for rapid edits and simple image generation, while Nano Banana Pro (Gemini 3 Pro) is built for complex scene creation, infographics, detailed imagery, and accurate text rendering. Both require different prompting approaches.
3. What makes a good prompt for Nano Banana?
Effective Nano Banana prompts clearly describe:
The main subject and its action
Contextual details (background, mood, lighting)
Desired style or aesthetic (e.g., photorealistic, watercolor, 3D)
This helps the model interpret your intention and produce higher-quality outputs.
4. Can Nano Banana edit existing images?
Yes — Nano Banana excels at semantic editing, where you describe the exact object or section to change using natural language (e.g., “remove the tree in the background and keep the lighting the same”).
5. Is Nano Banana good for professional image tasks?
It depends on the task:
For simple edits, quick styles, and basic image output — yes.
For complex layouts, detailed scenes, text graphics, and structured visuals — Nano Banana Pro is typically more suitable.
6. Are there best practices for using Nano Banana prompts?
Yes — common tips include:
Be specific with descriptive words
Define the context and desired mood
Use multiple reference images when mixing elements
Set lighting and style expectations in the prompt text
7. Do I need any technical skill to use Nano Banana?
No. The model is designed for creators of all experience levels — you only need to describe what you want in clear language (often just a few well-chosen words).
8. How does Nano Banana handle style and composition?
Nano Banana can apply style transfers and adjust composition by painting over or modifying existing pixels based on the prompt instructions, rather than building scenes from scratch.
9. Can I use Nano Banana for social media or marketing visuals?
Yes. Many creators use Nano Banana to quickly generate content for social media posts, ad visuals, mockups, and blog illustrations thanks to its fast turnaround and intuitive prompting.