
Jewelry Macro Photography with a 100mm Lens: Pro Settings + AI Prompts That Sell
Mastering the Glimmer: Jewelry Macro Photography Prompt 100mm Lens
There is a specific, quiet magic that happens when you bring a 100mm macro lens to a piece of fine jewelry. It is the moment when a hidden inclusion in a diamond becomes a galaxy of its own, or when the microscopic grain of hand-brushed gold tells a story of craftsmanship that the naked eye simply misses.
As a photographer, you aren’t just taking a picture of an object; you are capturing a legacy, an engagement, or a hard-earned reward. But as you likely know, jewelry is a fickle subject. It reflects everything, hides its depth, and demands absolute perfection. Using a jewelry macro photography prompt 100mm lens setup is your bridge between a simple product shot and a piece of visual art that resonates with the soul.
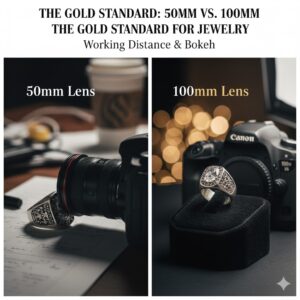
Why the 100mm Lens is the Gold Standard for Jewelry
Jewelry macro photography prompt 100mm lens
In the world of macro, focal length determines your “working distance”—the physical space between your glass and the subject. While a 50mm macro lens might force you to sit right on top of a ring, the 100mm focal length is often considered the “sweet spot” for several reasons:
Generous Working Distance: You can stay far enough back to avoid casting shadows on the jewelry or, worse, seeing your own camera reflected in the polished metal.
Compression and Bokeh: The longer focal length provides a flattering compression. By using a $100mm$ lens, you create a creamy background blur ($bokeh$) that makes the jewelry “pop” against its environment.
True 1:1 Magnification: Most 100mm macro lenses offer life-size reproduction, which is essential when you need to capture the tiny hallmark on the inside of a band or the precise facets of a gemstone.
Essential Gear: Supporting Your Vision
Jewelry macro photography prompt 100mm lens
To execute a professional-grade shoot, your supporting cast of gear is just as vital as the lens itself. Because you are working with such high magnification, even the slightest vibration—like a passing truck outside or your own heartbeat—can introduce blur.
The Stability Requirement
Sturdy Tripod: This is non-negotiable. You need a platform that won’t budge during long exposures.
Remote Shutter Release: Touching the camera to take the photo creates “camera shake.” Use a cable or wireless remote, or at the very least, your camera’s 2-second timer.
Macro Rail: This specialized tool allows you to make micro-adjustments in distance (moving the camera forward or backward by millimeters) to find the perfect focal plane without touching the lens ring.
Mastering the Settings: A “Recipe” for Success

Setting up your camera for jewelry requires a delicate balance of light, depth, and clarity. You aren’t just guessing; you are following a technical recipe to ensure the metal looks smooth and the gems look sharp.
Jewelry Photography Setting “Recipe”
| Setting | Recommended Value | Why It Matters |
| ISO | 100 | Minimizes digital noise for “clean,” silky metal surfaces. |
| Aperture | $f/8$ to $f/13$ | The “sweet spot” for sharpness before diffraction (blurring) sets in. |
| Shutter Speed | 1/125s to 1/160s | Standard for studio strobes; otherwise, let the tripod handle longer speeds. |
| Focus Mode | Manual Focus | Auto-focus often “hunts” on shiny surfaces; your eyes are more reliable here. |
| File Format | RAW | Provides maximum data for post-processing reflections and white balance. |
Lighting and Reflection Control
Jewelry macro photography prompt 100mm lens
Jewelry is essentially a collection of tiny, curved mirrors. Your job isn’t just to “light” the piece, but to give those mirrors something beautiful to reflect.
The “White World” Approach: Using light tents or softboxes creates a seamless white environment. This ensures that the reflections on a silver ring are clean white gradients rather than the clutter of your living room.
Diffused LED Panels: Position these at 45-degree angles to the piece. This creates “specular highlights”—those bright glints that make a diamond look alive.
Using Flags (Black/White Cards): If your jewelry looks too bright and loses its shape, place small strips of black paper just outside the frame. This adds “definition” or “negative fill” to the edges of the metal, giving the piece a 3D feel.
Advanced Technique: Focus Stacking
When you use a jewelry macro photography prompt 100mm lens, you will notice a frustrating reality: even at $f/11$, the depth of field is incredibly shallow. You might have the front of the ring sharp, but the gemstone in the back is a blur. The solution is Focus Stacking.
Capture a Series: While your camera is on a tripod, take 10 to 30 photos. For each shot, shift the focus slightly from the very front of the jewelry to the very back.
The Merge: Use software like Adobe Photoshop or Helicon Focus to “stack” these images. The software identifies the sharpest parts of every photo and blends them into one.
The Result: You get a “tack-sharp” image that defies the laws of optics, showing every microscopic detail from front to back in crisp focus.
Post-Processing: The Final Polish
No matter how perfect your lighting is, jewelry often requires a bit of digital “dusting.”
Spot Healing: Even a microscopic speck of dust looks like a boulder at 1:1 magnification.
Color Correction: Use a gray card during your shoot to ensure the “gold” in your photo actually looks like gold, not a sickly yellow or orange.
Contrast Enhancement: Use “Curves” to deepen the shadows in the metal, which helps emphasize the brilliance of the stones.
Frequently Asked Questions (FAQ)
What is the best jewelry macro photography prompt 100mm lens setting for beginners?

If you are just starting, set your camera to Manual Mode: ISO 100, Aperture $f/11$, and Shutter Speed 1/10s (on a tripod). Use Manual Focus and utilize your camera’s “Live View” screen to zoom in digitally and ensure the most important facet of the gem is perfectly sharp.
Why does my jewelry look “flat” or “dull” in my macro shots?
This usually happens because the light is too diffused. While you want soft light to avoid harsh glares, you still need one “key” light source to be slightly stronger than the others. This creates the “fire” and “scintillation” inside a gemstone that makes it look expensive.
Do I really need a 100mm lens, or can I use a 50mm macro?
A 50mm macro lens can take great photos, but you have to be physically much closer to the jewelry. This often creates two problems: your lens might block your light sources, and the camera itself might show up as a dark reflection in the metal. The 100mm lens gives you the “breathing room” to light the subject properly.
How do I stop my camera from reflecting in the jewelry?
Try cutting a small hole in a piece of white foam board and poking your lens through it. The jewelry will now “see” a white wall instead of your black camera body.
Conclusion
Capturing the perfect jewelry shot is a test of patience, precision, and technical mastery. By utilizing a jewelry macro photography prompt 100mm lens strategy, you give yourself the technical advantage needed to document the intricate beauty of fine pieces. Remember, the lens sees what the eye misses—your job is to make sure what it reveals is nothing short of flawless.
Ready to take your product imagery to the next level? Try setting up your first “Focus Stack” today and see the difference that total clarity makes. If you found this guide helpful, share your results with us or leave a comment below with your favorite macro photography tip!