
How to Turn an Idea Into Detailed Image Prompts That Actually Work
How to Turn an Idea Into Detailed Image Prompts That Actually Work
You’ve probably been there: a clear idea in your head, a strong visual feeling, and high expectations—only to get an image that feels generic or completely off. That gap between what you imagine and what the AI delivers is not a talent problem. It’s a prompt problem.
Once you learn how to turn an idea into detailed image prompts, you stop guessing and start directing. This guide shows you exactly how to do that, step by step, in a way that feels natural, repeatable, and effective.
What Are Detailed Image Prompts (and Why You Need Them)
A detailed image prompt is a structured description that tells an AI what to generate, how it should look, and why those details matter. Instead of hoping the model “understands” your idea, you break it down into visual instructions it can actually follow.
Basic prompt vs. detailed image prompt
- Basic: “A woman drinking coffee”
- Detailed: “A young woman sitting by a café window at sunrise, holding a ceramic coffee cup, soft warm light on her face, shallow depth of field, cinematic photography style”
The second one works because it removes ambiguity. AI models don’t imagine emotions or scenes unless you translate them into visible elements.
The Mindset Shift: Think Like a Camera, Not a Person
Before you write better prompts, you need to change how you think.
AI doesn’t feel—AI sees
When you say:
- “calm”
- “luxury”
- “powerful”
The AI asks: What does that look like?
You must answer that visually:
- Calm → soft lighting, neutral colors, relaxed posture
- Luxury → premium materials, clean composition, controlled lighting
- Power → low camera angle, strong contrast, confident body language
This shift alone improves your detailed image prompts instantly.
Breaking an Idea Into Visual Ingredients
Every strong prompt is built from components. When you separate them, clarity appears.
Core visual elements
- Subject – Who or what is the focus?
- Action – What is happening?
- Environment – Where is this taking place?
- Lighting – Natural, dramatic, soft, studio?
- Mood – Conveyed through color, posture, contrast
- Style – Photography, illustration, cinematic, realistic
- Technical details – Angle, lens, depth of field
Think of your prompt as a recipe. Miss one ingredient, and the result changes.
Step-by-Step: Turning an Idea Into a Detailed Image Prompt
Step 1: Define the core idea
Start simple. Ask yourself:
- What must be visible?
- What is the main focus?
Example:
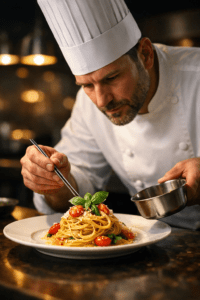
“A chef preparing food” is still vague.
“A professional chef plating pasta” is clearer.
Step 2: Add environment and context
Context shapes meaning.
- Indoor or outdoor?
- Time of day?
- Modern or traditional?
Instead of “in a kitchen,” try:
- “In a rustic Italian kitchen with wooden counters and natural window light”
Step 3: Choose a visual style
Style tells the AI how to render the scene.
- Cinematic photography
- Editorial food photography
- Ultra-realistic
- Hand-painted illustration
Be intentional. Random styles lead to inconsistent results.
Step 4: Control mood through visible cues
Avoid abstract emotions. Show them.
- Use color temperature
- Use lighting direction
- Use facial expressions or posture
For example:
- Warm light + soft shadows = inviting
- High contrast + dark background = dramatic
Step 5: Add camera and technical details
This is where detailed image prompts feel professional.
- Camera angle (close-up, wide shot, top-down)
- Lens (35mm, 50mm, macro)
- Depth of field
- High-resolution or ultra-detailed
These details guide realism and composition.
The Proven Formula for Detailed Image Prompts
Use this structure when writing prompts:
- Subject
- Action
- Environment
- Lighting
- Mood
- Style
- Technical details
Example formula in action
“A professional chef plating fresh pasta in a rustic Italian kitchen, warm natural window light, calm and elegant mood, cinematic food photography, shallow depth of field, 50mm lens, ultra-detailed”
This format works across most image-generation tools because it follows visual logic.
Using Tables to Build Image Prompts (Recipe Method)
Tables help you organize ideas before turning them into text. Think of this like preparing ingredients before cooking.
| Ingredient | Description | Purpose |
|---|---|---|
| Subject | Professional chef | Main focus |
| Action | Plating pasta | Adds movement |
| Environment | Rustic Italian kitchen | Context |
| Lighting | Warm natural light | Mood |
| Style | Cinematic food photography | Visual direction |
| Camera | 50mm lens, shallow depth | Realism |
Once the table is complete, convert it into a single, flowing prompt.
Common Mistakes That Ruin Detailed Image Prompts
Overloading without structure
Adding many details without order confuses the model. Always prioritize the subject first.
Using vague adjectives
Words like “beautiful” or “amazing” do nothing unless you show how they appear visually.
Ignoring consistency
Mixing styles (realistic + cartoon + watercolor) often leads to unpredictable results.
Adapting Detailed Image Prompts for Different AI Tools
While the core structure stays the same, each tool has preferences:
- Some respond better to concise prompts
- Others benefit from richer descriptive layers
The key is clarity, not length. Detailed image prompts work because they remove uncertainty.
FAQ: Detailed Image Prompts
What makes a prompt a detailed image prompt?
Clear visual elements, structured descriptions, and intentional style choices.
How long should detailed image prompts be?
As long as needed to remove ambiguity—no longer.
Can beginners create professional detailed image prompts?
Yes. A repeatable framework matters more than experience.
Do detailed image prompts improve consistency?
Absolutely. They reduce randomness and increase control.
Conclusion: Turn Imagination Into Precision
Once you stop hoping and start describing, everything changes. Detailed image prompts allow you to translate ideas into visuals with purpose and control. You’re no longer reacting to what the AI gives you—you’re directing it.
Your next step
Take one idea you already have. Break it into visual ingredients. Write one detailed image prompt using the framework above. Then refine it. That’s how mastery begins.
👉 Now it’s your turn: experiment, save your best prompts, and build your own prompt library. The more intentional you become, the better your images will look.